Dear James: We are remodeling on budget, so I thought adding window cornices would help. How do I determine the best size, and how can I make them myself? — Jennie R.
Dear Jennie: For a dramatic improvement in any room's decor, making and installing cornices over your windows is a wise choice. They add a decorative touch while hiding the curtain and drapery rods and hardware. They don't need to be extremely ornate, so building them is a do-it-yourself job that most people can handle easily.
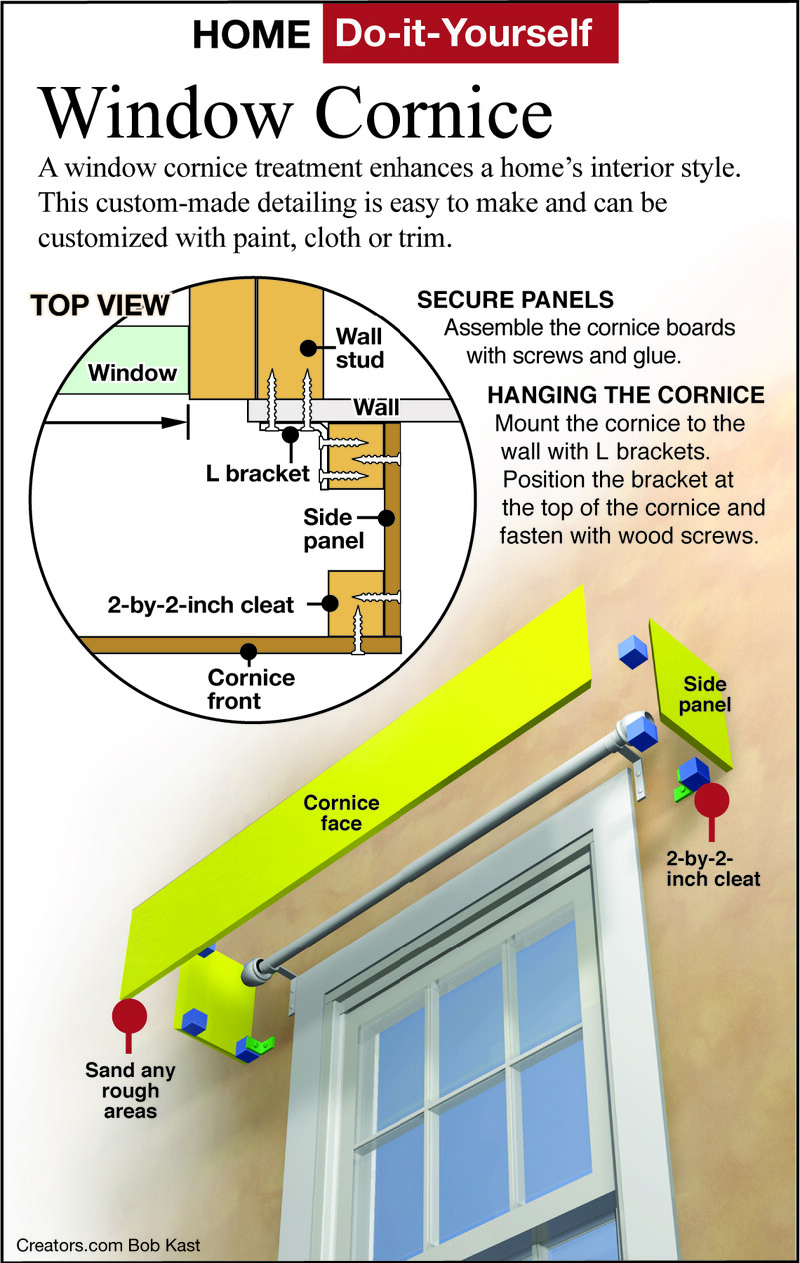
A simple rectangular cornice is the easiest design to build. Use lauan plywood, which is simple to cut with a jigsaw fitted with a fine-tooth blade. It can be finished with fabric, upholstery, paint or a decorative faux finish. Check a few interior design shops for styling ideas.
There really is not a proper size for a cornice. You want to make sure that it hides all the curtain hardware and does not look out of proportion to the window opening size. A rule of thumb is the width should be equal to the outside window casing width plus about 4 1/2 inches for the cleat and brackets.
You can select any height depending on how much of the window glass you want to remain exposed. In general, though, the bottom of the cornice is lined up with the top of the glass and it extends about 5 inches above the top of the window molding. This should cover almost any design of curtain hardware.
Once you have determined the size of the cornice, draw a pattern for the front face either on a piece of brown paper or directly on the lauan plywood. Use a carpenter's square to make sure it is truly square. If you drew it on paper first, carefully cut it out and lay it on the plywood as a pattern. Use the jigsaw to cut out the front face.
Make the side panels next. Measure the depth of the window casing plus the depth of curtain hardware and curtains and then add 1 inch of clearance to this. These will be fairly small pieces, so you will probably not have to make a paper pattern first. Just draw them on the plywood and cut them out with the jigsaw.
Cut four 2-by-2-inch cleats from the two-by-four lumber. Use two of these cleats on each side to attach the sides to the front face. Use wood glue and flathead wood screws to attach the cleats to each piece. Make two more cleats of any size and attach them to the back of the sides where they will mount over the window.
Measure carefully so that the cleats are inset exactly 1/4 inch from the edge of the front face. This will insure that sides are flush with the edge of the face. Once the glue is set, sand the edges of the cornice for a seamless joint. Decorate the cornice however you wish.
Attach L brackets to the back cleats with screws. Since you are working around a window, you may find a wall stud to screw the L brackets to. If not, use a drywall screw and an anchor.


View Comments